Are you wondering if you can use a remote with a Raspberry Pi? The short answer is yes, and it opens up a world of possibilities for your DIY projects. Whether you're a tech enthusiast, a hobbyist, or someone looking to automate your home, integrating a remote control with your Raspberry Pi can significantly enhance its functionality. From controlling media centers to managing smart home devices, the Raspberry Pi's versatility shines when paired with the right remote. In this article, we'll explore how you can achieve this setup and the various ways it can benefit your projects.
Using a remote with a Raspberry Pi is not only feasible but also relatively straightforward, thanks to the growing community of developers and the availability of open-source tools. The Raspberry Pi's GPIO pins and software libraries allow you to interface with a wide range of remote controls, including infrared (IR) and Bluetooth-enabled devices. This flexibility means you can customize your Pi to work with almost any remote, making it an excellent choice for a variety of applications. Let’s dive deeper into how this setup works and what you need to get started.
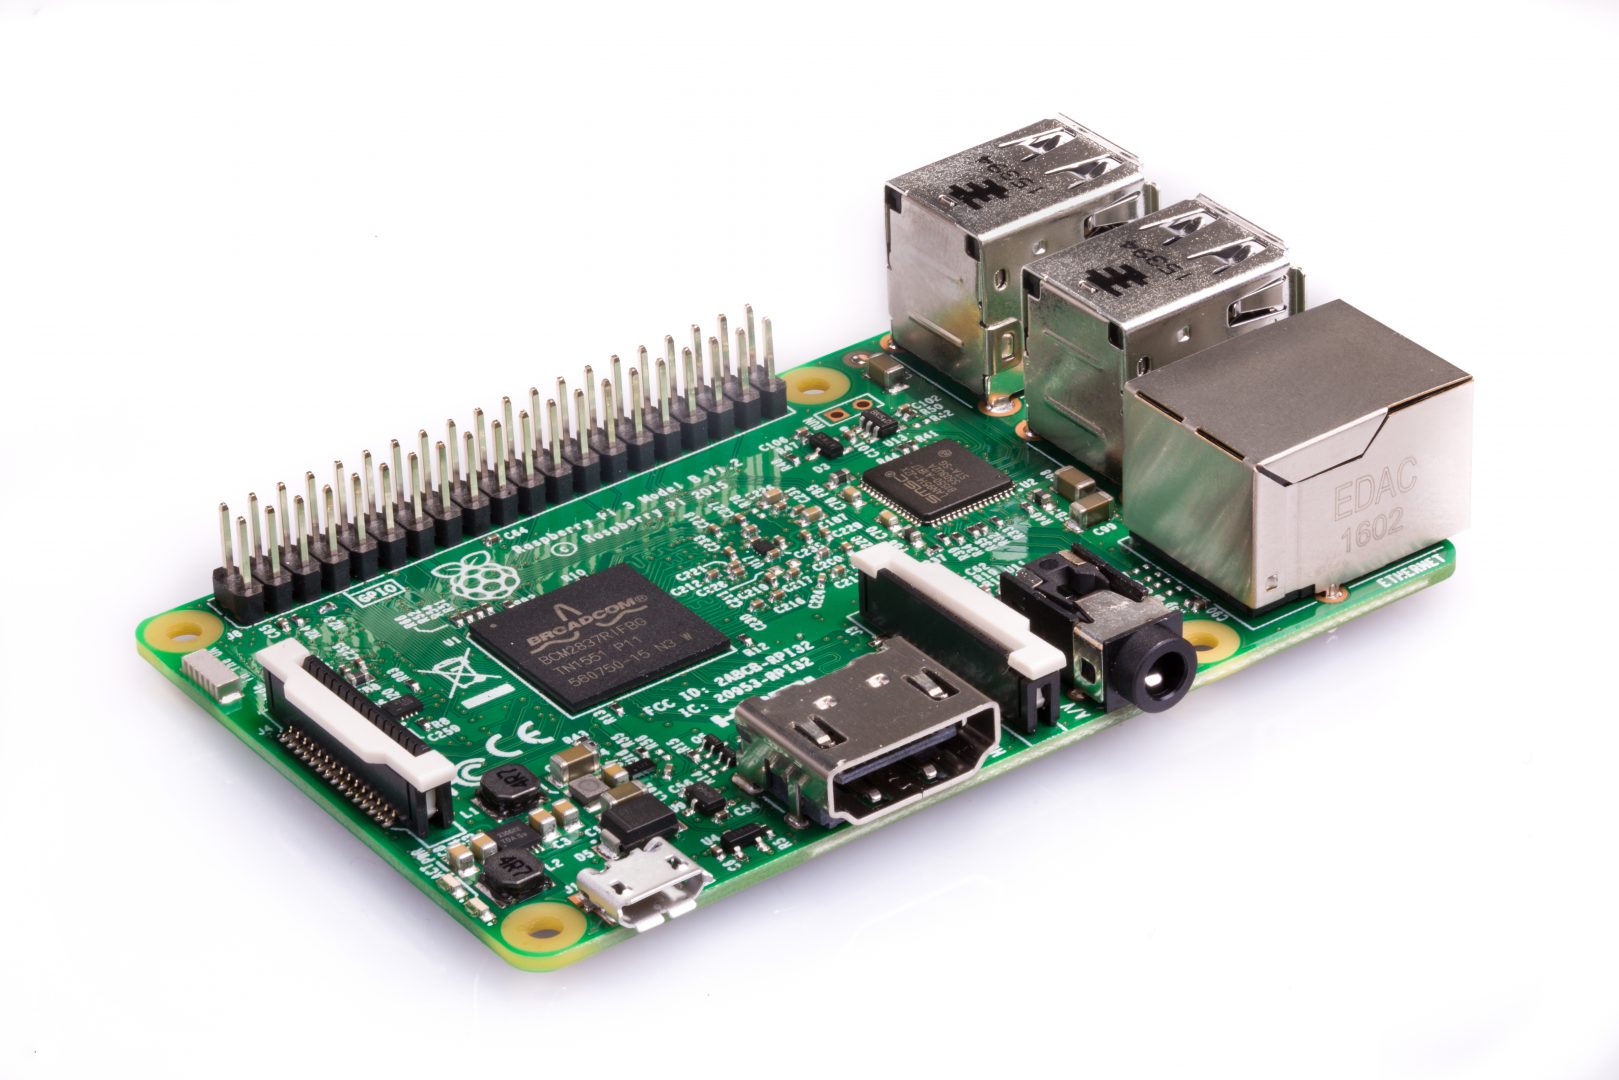
Before we proceed, it’s important to note that the process of integrating a remote with a Raspberry Pi involves both hardware and software components. You’ll need to ensure your Pi is equipped with the necessary accessories, such as an IR receiver or Bluetooth dongle, depending on the type of remote you plan to use. Additionally, configuring the software to recognize and interpret signals from your remote is a critical step. In the sections below, we’ll guide you through each step of the process, ensuring you have all the tools and knowledge you need to succeed.
Read also:Understanding Gianna Bryants Autopsy A Comprehensive Analysis
Table of Contents
- What Types of Remotes Can You Use with a Raspberry Pi?
- How Do You Set Up an Infrared Remote with a Raspberry Pi?
- Can You Use a Bluetooth Remote with a Raspberry Pi?
- What Are the Practical Applications of Using a Remote with a Raspberry Pi?
- How to Troubleshoot Common Issues with Remote and Raspberry Pi Setup?
- What Software Tools Are Available for Remote Integration?
- Why Should You Consider Using a Remote with Your Raspberry Pi?
- Frequently Asked Questions about Remote and Raspberry Pi Usage
What Types of Remotes Can You Use with a Raspberry Pi?
When it comes to using a remote with a Raspberry Pi, the options are quite diverse. The most common types of remotes compatible with the Raspberry Pi include infrared (IR) remotes, Bluetooth-enabled remotes, and even Wi-Fi-based remotes. Each type has its own advantages and use cases, making it essential to choose the one that best suits your project requirements.
Infrared remotes are the most traditional and widely used option. They communicate with the Raspberry Pi via an IR receiver connected to its GPIO pins. These remotes are inexpensive, easy to set up, and widely supported by libraries like LIRC (Linux Infrared Remote Control). If you’re looking to control media playback or manage a DIY smart home system, an IR remote is a reliable choice.
Bluetooth remotes, on the other hand, offer a more modern and wireless solution. They eliminate the need for line-of-sight communication, making them ideal for projects where the Pi is hidden or located in a hard-to-reach area. Most Raspberry Pi models come with built-in Bluetooth support, but older versions may require an external Bluetooth dongle. Finally, Wi-Fi-based remotes are less common but can be used in conjunction with mobile apps to control your Pi remotely over a network.
How Do IR Remotes Work with Raspberry Pi?
IR remotes communicate with the Raspberry Pi through infrared signals, which are detected by an IR receiver module. To set this up, you’ll need to connect the receiver to the Pi’s GPIO pins and install software like LIRC to decode the signals. This setup is perfect for media center projects, such as turning your Pi into a Kodi box.
What Are the Benefits of Bluetooth Remotes?
Bluetooth remotes provide a seamless and wireless experience. They are especially useful for controlling applications like presentations, games, or smart home devices. The lack of line-of-sight dependency makes them more versatile than IR remotes, and their compatibility with mobile apps adds another layer of convenience.
How Do You Set Up an Infrared Remote with a Raspberry Pi?
Setting up an infrared remote with a Raspberry Pi is a straightforward process, but it requires some preparation and attention to detail. The first step is to gather the necessary hardware, which includes an IR receiver module, jumper wires, and a compatible remote control. Once you have these components, you can proceed with the setup.
Read also:Hello Kittys Friends Name The Ultimate Guide To Her Beloved Companions
To begin, connect the IR receiver to the Raspberry Pi’s GPIO pins. The receiver typically has three pins: VCC, GND, and OUT. Connect the VCC pin to a 3.3V power source, the GND pin to the ground, and the OUT pin to a GPIO pin of your choice. After the hardware setup, you’ll need to install and configure the LIRC software, which is responsible for decoding the IR signals. This can be done using the terminal with a few simple commands.
Once LIRC is installed, you’ll need to configure it to recognize your remote. This involves running a test to capture the signals from your remote and mapping them to specific actions on your Pi. The configuration file can be edited to assign commands like play, pause, or volume control to the buttons on your remote. With everything set up, you’ll be able to control your Pi effortlessly using the IR remote.
What Are the Steps to Install LIRC?
Installing LIRC involves updating your Pi’s package list, installing the software, and enabling the IR receiver. Use the following commands in the terminal:
- sudo apt update
- sudo apt install lirc
- Edit the
/boot/config.txtfile to enable the IR receiver.
How to Map Remote Buttons to Actions?
To map buttons, use the irrecord command to capture signals and create a configuration file. Edit the file to assign specific actions to each button, such as controlling media playback or navigating menus.
Can You Use a Bluetooth Remote with a Raspberry Pi?
Yes, you can use a Bluetooth remote with a Raspberry Pi, and it’s an excellent option for those seeking a wireless solution. Most modern Raspberry Pi models, such as the Raspberry Pi 4 and Raspberry Pi 3, come with built-in Bluetooth capabilities, making it easy to pair and use Bluetooth-enabled devices. For older models, you can use an external Bluetooth dongle to achieve the same functionality.
To set up a Bluetooth remote, you’ll first need to ensure that Bluetooth is enabled on your Pi. This can be done through the terminal or the graphical user interface. Once Bluetooth is active, you can pair your remote by scanning for available devices and selecting your remote from the list. After pairing, you can configure the remote to work with your desired applications, such as Kodi or a custom Python script.
One of the advantages of using a Bluetooth remote is its versatility. Unlike IR remotes, Bluetooth devices don’t require line-of-sight communication, allowing you to control your Pi from any angle or even through walls. Additionally, many Bluetooth remotes come with additional features like touchpads or voice control, making them ideal for advanced projects.
What Are the Steps to Pair a Bluetooth Remote?
Pairing a Bluetooth remote involves enabling Bluetooth, scanning for devices, and selecting your remote. Use the bluetoothctl command in the terminal to manage the pairing process.
What Are the Best Bluetooth Remotes for Raspberry Pi?
Some popular Bluetooth remotes for Raspberry Pi include the FLIRC USB receiver, Logitech K400 Plus, and the Microsoft Bluetooth Keyboard. These devices offer excellent compatibility and additional features like touchpads or multimedia keys.
What Are the Practical Applications of Using a Remote with a Raspberry Pi?
Using a remote with a Raspberry Pi opens up a wide range of practical applications, making it a valuable tool for both hobbyists and professionals. One of the most common uses is transforming your Pi into a media center. By pairing it with an IR or Bluetooth remote, you can control media playback, navigate menus, and adjust settings effortlessly, creating a seamless entertainment experience.
Another popular application is home automation. With a remote, you can control smart home devices, such as lights, thermostats, and security systems, directly from your Pi. This setup is particularly useful for creating a centralized control system that can be managed from a single remote. Additionally, the Raspberry Pi can be used as a remote server for managing files, running scripts, or hosting websites, with the remote providing convenient access to these functions.
For educational purposes, using a remote with a Raspberry Pi can help teach programming and electronics. Students can learn how to interface hardware components, write scripts to interpret remote signals, and develop their own custom applications. This hands-on approach fosters creativity and problem-solving skills, making it an excellent learning tool.
How Can You Use a Remote for Home Automation?
To use a remote for home automation, integrate your Pi with platforms like Home Assistant or OpenHAB. Map remote buttons to control devices like smart lights or thermostats, creating a personalized smart home system.
What Are the Educational Benefits of Using a Remote with a Pi?
Using a remote with a Pi teaches students about hardware interfacing, signal decoding, and programming. It also encourages creativity by allowing them to design custom applications for their projects.
How to Troubleshoot Common Issues with Remote and Raspberry Pi Setup?
While setting up a remote with a Raspberry Pi is generally straightforward, you may encounter some common issues along the way. One frequent problem is the Pi failing to recognize the remote signals. This can happen if the IR receiver is not properly connected or if the LIRC software is misconfigured. To resolve this, double-check your hardware connections and ensure that the configuration file accurately maps the remote buttons to actions.
Another issue you might face is Bluetooth pairing problems. If your Pi is unable to detect or pair with the remote, try resetting the Bluetooth service or using a different USB port for the dongle. Additionally, ensure that your remote’s batteries are fully charged, as low power can interfere with the pairing process.
For both IR and Bluetooth setups, software conflicts can also cause issues. If your Pi is running multiple services that use the same GPIO pins or Bluetooth resources, it may lead to unexpected behavior. To avoid this, disable unnecessary services and ensure that your remote setup has exclusive access to the required resources.
What to Do If the Remote Isn’t Working?
If the remote isn’t working, check the hardware connections, verify the software configuration, and ensure that the Pi’s operating system is up to date. Restarting the Pi can also resolve temporary glitches.
How to Fix Bluetooth Pairing Issues?
To fix Bluetooth pairing issues, reset the Bluetooth service using sudo systemctl restart bluetooth, ensure the remote is discoverable, and try pairing again. If the issue persists, consider using a different Bluetooth dongle.
What Software Tools Are Available for Remote Integration?
Several software tools are available to facilitate remote integration with a Raspberry Pi, each offering unique features and capabilities. One of the most popular tools is LIRC (Linux Infrared Remote Control), which is specifically designed for decoding IR signals. LIRC supports a wide range of remotes and provides a flexible framework for mapping buttons to actions, making it an excellent choice for media center projects.
For Bluetooth remotes, tools like bluez and bluetoothctl are essential for managing pairing and communication. These tools allow you to scan for devices, pair with remotes, and configure Bluetooth settings directly from the terminal. Additionally, platforms like Home Assistant and OpenHAB