Veneer prep before and after is a transformative process that can significantly enhance your smile and overall appearance. Dental veneers, thin shells made of porcelain or composite resin, are designed to cover the front surface of teeth, correcting imperfections such as discoloration, chips, or gaps. This cosmetic dental procedure has gained immense popularity due to its ability to deliver stunning results in a relatively short time. Whether you're considering veneers for aesthetic reasons or to restore damaged teeth, understanding the preparation process and the outcomes is essential. From the initial consultation to the final placement, every step plays a crucial role in achieving a smile that looks and feels natural.
The journey of veneer prep before and after begins with a comprehensive evaluation by a qualified dentist. During this phase, the dentist assesses your oral health, discusses your goals, and determines whether you're a suitable candidate for veneers. Once approved, the preparation phase involves reshaping the tooth enamel to ensure a perfect fit for the veneers. This step is both an art and a science, requiring precision and expertise to maintain the tooth's integrity while achieving the desired aesthetic outcome. After the veneers are crafted in a dental lab, they are bonded to your teeth, completing the transformation. The results are often life-changing, offering patients a renewed sense of confidence and a radiant smile.
Many individuals wonder what to expect during the veneer prep before and after process. While the procedure is minimally invasive, it requires careful planning and execution to ensure long-lasting results. Patients often report minimal discomfort during the preparation phase, and the final outcome is well worth the effort. With advancements in dental technology, veneers now offer a durable and natural-looking solution for a wide range of cosmetic concerns. Whether you're aiming for a Hollywood smile or simply want to address minor imperfections, veneers can help you achieve your goals. Keep reading to explore the details of this transformative process and discover how veneers can enhance your smile.
Read also:What Makes The Double Down Sandwich A Gamechanging Culinary Creation
Table of Contents
- What Are Veneers and How Do They Work?
- Is Veneer Prep Painful? What to Expect During the Process
- Step-by-Step Guide to Veneer Preparation
- Veneer Prep Before and After: Real-Life Transformations
- How Long Do Veneers Last? Maintenance Tips for Longevity
- Can Veneers Fix My Smile? Common Concerns Addressed
- What Is the Cost of Veneer Prep? Does Insurance Cover It?
- Are There Alternatives to Veneers? Exploring Other Options
What Are Veneers and How Do They Work?
Veneers are custom-made, wafer-thin shells designed to cover the front surface of teeth, improving their appearance. Typically made from porcelain or composite resin, veneers are a versatile cosmetic dental solution that can address a variety of aesthetic concerns. Porcelain veneers are known for their durability and natural translucency, closely mimicking the appearance of natural teeth. On the other hand, composite resin veneers are more affordable and can be applied in a single visit, though they may not last as long as porcelain.
The process of applying veneers involves several steps, starting with a consultation to determine whether veneers are the right solution for your needs. During this phase, your dentist will examine your teeth, discuss your goals, and create a personalized treatment plan. Once you decide to proceed, the veneer prep phase begins. This involves removing a small amount of enamel from the tooth's surface to ensure the veneer fits seamlessly. The dentist then takes an impression of your teeth, which is sent to a dental lab where the veneers are crafted. After a few weeks, the veneers are bonded to your teeth using a special adhesive, completing the transformation.
Veneers work by masking imperfections such as discoloration, chips, cracks, or gaps. They can also improve the shape and alignment of teeth, creating a uniform and attractive smile. Unlike other cosmetic procedures, veneers offer a minimally invasive solution with long-lasting results. With proper care, porcelain veneers can last up to 15 years, while composite resin veneers typically last around 5-7 years. Regular brushing, flossing, and dental check-ups are essential to maintain the appearance and durability of your veneers.
Is Veneer Prep Painful? What to Expect During the Process
One of the most common questions patients ask is, "Is veneer prep painful?" The good news is that the procedure is generally well-tolerated, with minimal discomfort. During the veneer prep phase, your dentist will administer a local anesthetic to numb the area, ensuring you remain comfortable throughout the process. The preparation involves removing a thin layer of enamel from the tooth's surface, which is necessary to create space for the veneer and achieve a natural fit.
What Happens During the Veneer Prep Phase?
The veneer prep phase is a critical step in the process, and understanding what to expect can help alleviate any anxiety. Here’s a breakdown of what happens:
- Anesthesia: Your dentist will apply a local anesthetic to numb the area, ensuring you don’t feel any pain during the procedure.
- Enamel Removal: A small amount of enamel is gently removed from the tooth's surface to accommodate the veneer. This step is essential for achieving a seamless fit.
- Impression Taking: After reshaping the tooth, your dentist will take an impression, which is sent to a dental lab for the fabrication of your custom veneers.
- Temporary Veneers: In some cases, temporary veneers may be placed to protect your teeth while you wait for the permanent ones.
How to Minimize Discomfort After Veneer Prep
While veneer prep is not typically painful, some patients may experience mild sensitivity or discomfort after the procedure. Here are a few tips to help you manage any post-procedure discomfort:
Read also:Is Neil Flynn Married In Real Life Discover The Truth About His Personal Life
- Avoid Hot or Cold Foods: Sensitivity to temperature is common after enamel removal. Stick to lukewarm foods and beverages for a few days.
- Use a Soft Toothbrush: Opt for a soft-bristled toothbrush to prevent irritation while brushing your teeth.
- Take Over-the-Counter Pain Relievers: If you experience any discomfort, over-the-counter pain relievers like ibuprofen can help.
In conclusion, veneer prep is a straightforward and minimally invasive procedure. With proper care and attention, you can expect a smooth and comfortable experience. If you're considering veneers, don't let fear of pain hold you back—consult with your dentist to learn more about the process and what you can expect.
Step-by-Step Guide to Veneer Preparation
Preparing for veneers is a multi-step process that requires careful planning and execution. Each phase plays a crucial role in ensuring the final result is both functional and aesthetically pleasing. Below is a detailed guide to help you understand the journey from start to finish.
Initial Consultation and Assessment
The first step in veneer preparation is the initial consultation. During this phase, your dentist will conduct a thorough examination of your teeth and gums to assess your oral health. This includes taking X-rays and discussing your goals for the procedure. Your dentist will also evaluate whether veneers are the best option for your needs or if alternative treatments might be more suitable. This is an excellent opportunity to ask questions and address any concerns you may have.
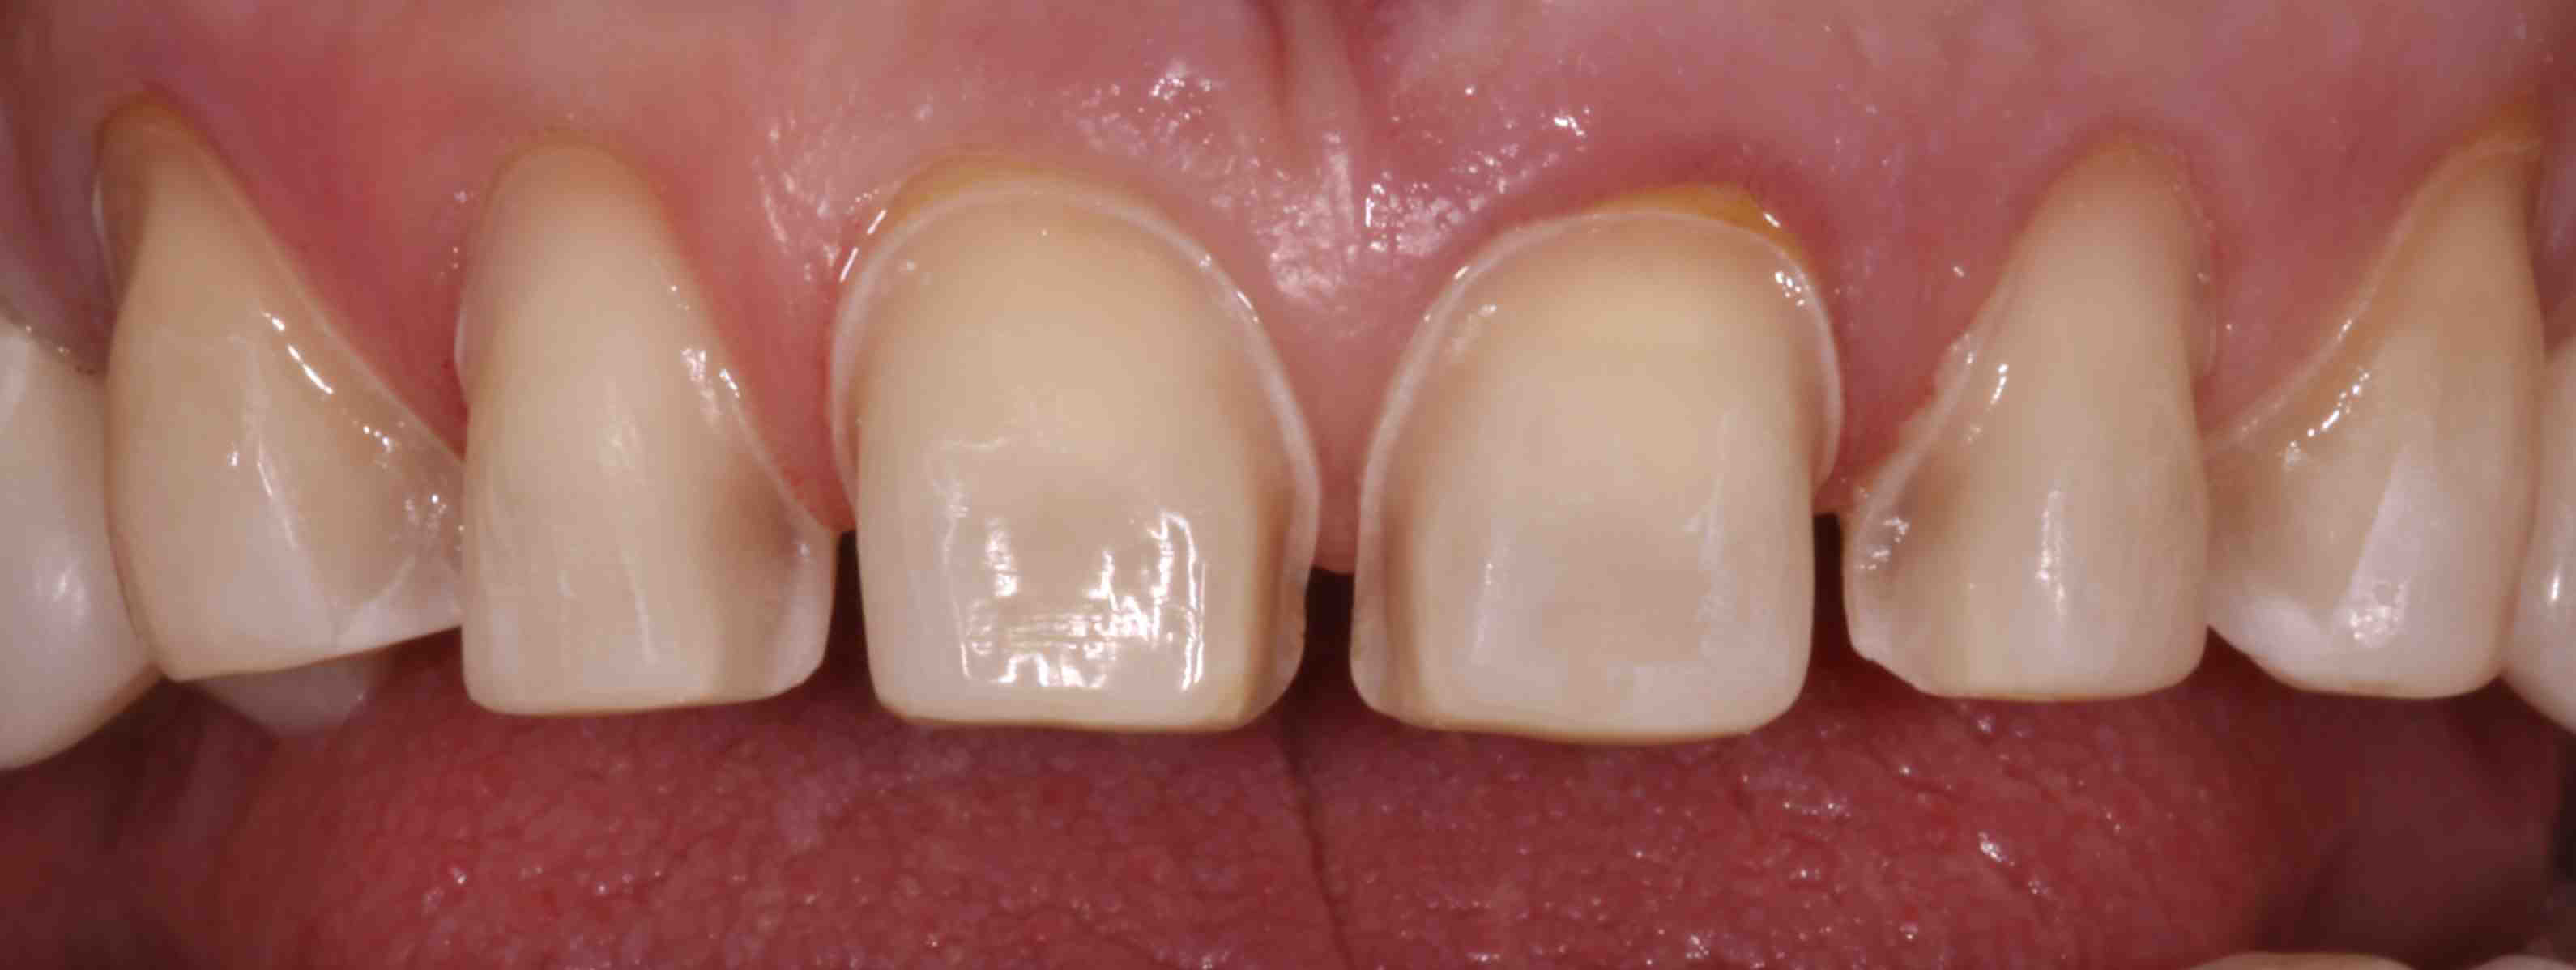
Teeth Reshaping and Enamel Removal
Once you've decided to proceed with veneers, the next step is teeth reshaping. This involves removing a small amount of enamel from the front surface of your teeth to create space for the veneer. The amount of enamel removed is typically less than a millimeter, ensuring the veneer fits snugly without appearing bulky. Your dentist will use specialized tools to carefully reshape the teeth, ensuring precision and maintaining the tooth's structural integrity.
Impression Taking and Temporary Veneers
After reshaping, your dentist will take an impression of your teeth. This impression serves as a blueprint for the dental lab, where your custom veneers will be crafted. The process of creating veneers can take a few weeks, during which time you may be fitted with temporary veneers to protect your teeth and maintain your appearance. Temporary veneers are not as durable as permanent ones, so it's important to avoid hard or sticky foods during this period.
Bonding and Final Adjustments
Once your permanent veneers are ready, you'll return to the dentist for the bonding phase. Your dentist will first place the veneers on your teeth to check the fit and color. If everything looks good, the veneers are bonded to your teeth using a strong dental adhesive. Any excess adhesive is removed, and the veneers are polished to achieve a natural shine. Your dentist will also make any necessary adjustments to ensure your bite feels comfortable and natural.
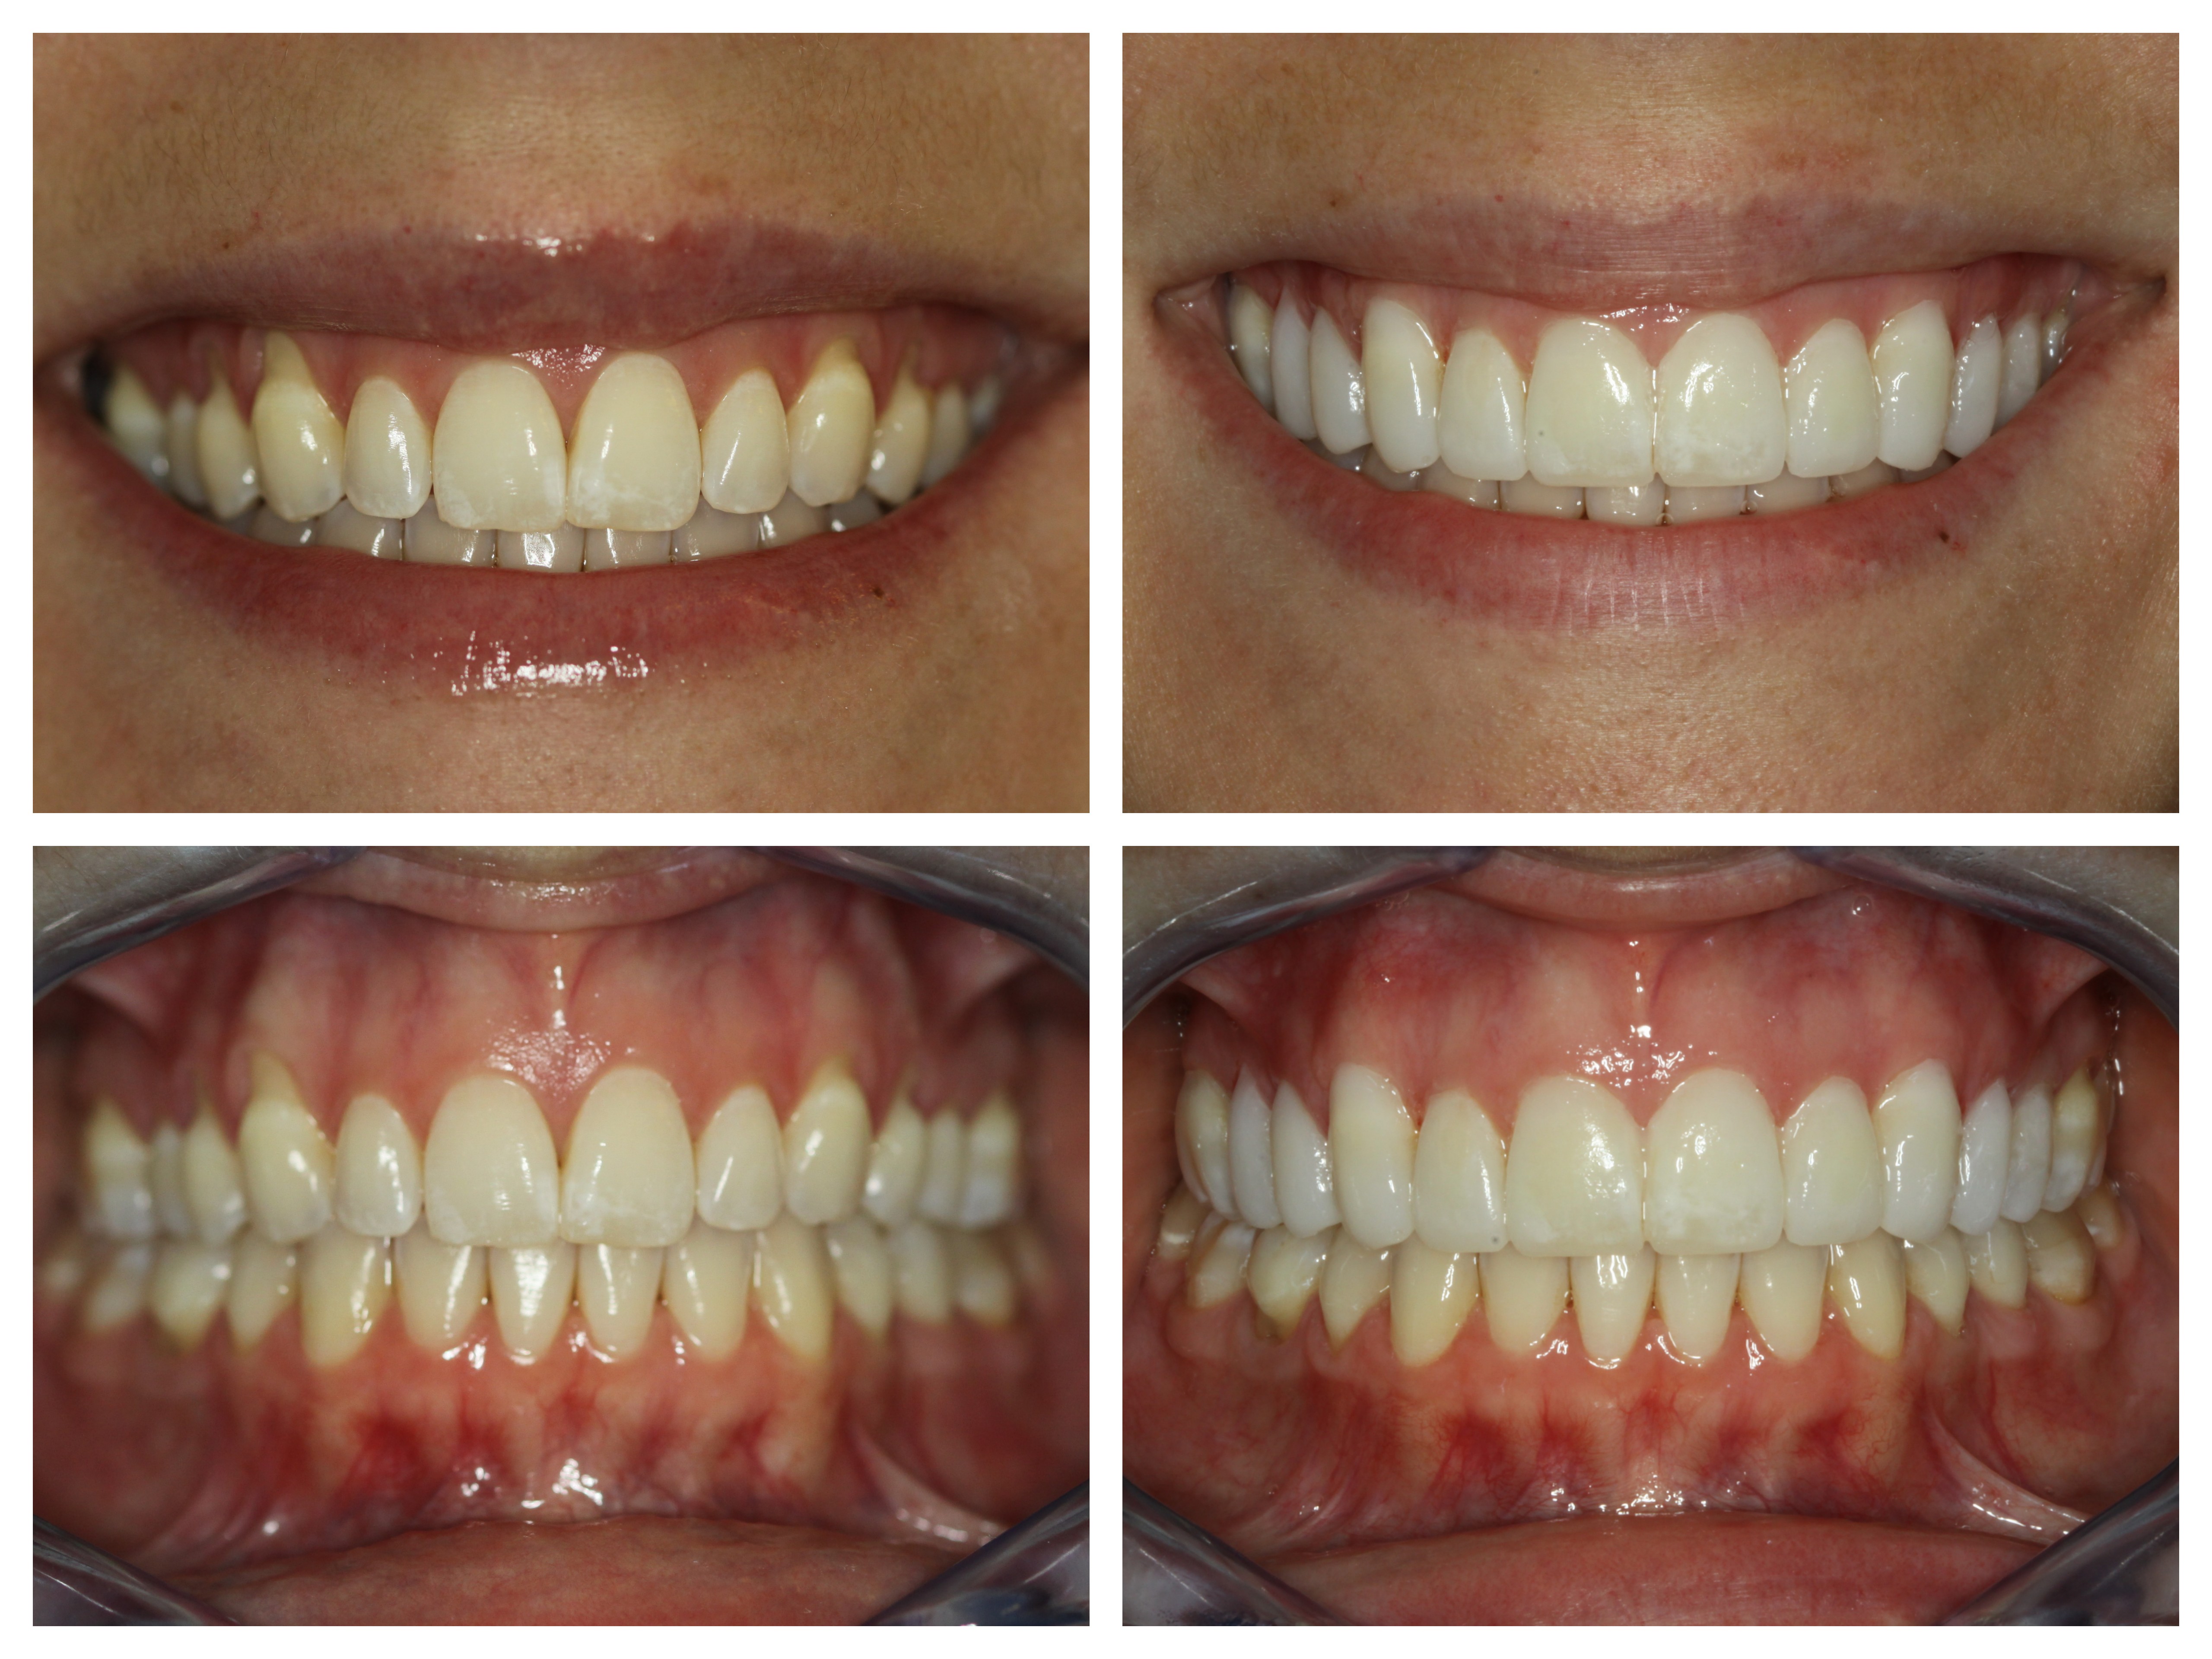
Veneer Prep Before and After: Real-Life Transformations
The veneer prep before and after transformation is nothing short of remarkable. Many patients who undergo this procedure report not only improved aesthetics but also a significant boost in self-confidence. Before veneers, individuals often struggle with self-consciousness due to stained, chipped, or misaligned teeth. After the procedure, they enjoy a radiant smile that enhances their overall appearance and self-esteem.
Case Study: From Stained Teeth to a Hollywood Smile
Take Sarah, for example, a 32-year-old marketing professional who had always been self-conscious about her stained teeth. Despite maintaining excellent oral hygiene, years of coffee consumption had left her teeth discolored. After consulting with her dentist, she opted for porcelain veneers. The veneer prep before and after results were astounding. Sarah’s once dull and uneven teeth were transformed into a bright, uniform smile. She now feels more confident during presentations and social interactions, crediting her veneers for the positive change in her personal and professional life.
Before and After: Addressing Gaps and Misalignment
Another inspiring case is John, a 45-year-old teacher who had always been self-conscious about the gaps between his teeth. Traditional orthodontic treatment was not an option due to time constraints. After undergoing the veneer prep before and after process, John’s smile was completely transformed. The veneers not only closed the gaps but also gave his teeth a straighter appearance. John now smiles freely, whether he’s teaching a class or posing for family photos.
These real-life examples highlight the transformative power of veneers. The veneer prep before and after journey is not just about aesthetics—it’s about empowering individuals to feel confident and proud of their smiles.
How Long Do Veneers Last? Maintenance Tips for Longevity
One of the most frequently asked questions about veneers is, "How long do veneers last?" The lifespan of veneers depends on several factors, including the material used, your oral hygiene habits, and how well you care for them. Porcelain veneers, known for their durability, can last up to 15 years or more with proper maintenance. Composite resin veneers, while more affordable, typically last around 5-7 years before requiring replacement.
How to Extend the Lifespan of Your Veneers
To ensure your veneers last as long as possible, follow these maintenance tips:
- Practice Good Oral Hygiene: Brush your teeth twice a day with a soft-bristled toothbrush and fluoride toothpaste. Floss daily to remove plaque and prevent gum disease.
- Avoid Hard Foods: Chewing on hard objects like ice or nuts can damage veneers. Opt for softer foods and avoid biting down on non-food items.
- Wear a Mouthguard: If you grind your teeth at night, wearing a custom-fitted mouthguard can protect your veneers from damage.
Signs It’s Time to Replace Your Veneers
Even with proper care, veneers may eventually need replacement. Signs that it’s time to replace your veneers include:
- Chipping or Cracking: V