Have you ever wondered how to take precise screenshots on your Chromebook? The snipping tool in Chromebook is a game-changer for users who need to capture specific parts of their screen with ease and precision. Whether you're a student, professional, or casual user, mastering this tool can significantly enhance your productivity. From capturing images for presentations to saving important information, the snipping tool in Chromebook offers versatility and simplicity. This article will guide you through everything you need to know about using this essential feature.
While many users are familiar with basic screenshot shortcuts, the snipping tool in Chromebook takes things a step further by allowing you to capture specific areas, annotate images, and save them in various formats. This tool is particularly useful for those who need to share screenshots with colleagues, create tutorials, or simply organize their digital workspace. In this guide, we’ll delve into the ins and outs of the snipping tool in Chromebook, ensuring you have all the knowledge you need to make the most of it.
By the end of this article, you'll not only understand how to use the snipping tool in Chromebook but also discover advanced techniques to edit and manage your screenshots. Whether you're new to Chromebooks or a seasoned user, this guide will provide valuable insights to help you streamline your workflow and make your digital life easier. Let’s dive in and explore how this tool can transform the way you interact with your Chromebook.
Read also:What Is The Ideal Temperature For Cooked Sausages A Complete Guide
Table of Contents
- What is the Snipping Tool in Chromebook?
- How to Access the Snipping Tool in Chromebook?
- Step-by-Step Guide to Using the Snipping Tool in Chromebook
- Can You Edit Screenshots with the Snipping Tool in Chromebook?
- What Are the Best Practices for Using the Snipping Tool in Chromebook?
- How to Save and Share Screenshots Using the Snipping Tool in Chromebook?
- Is There a Shortcut for the Snipping Tool in Chromebook?
- FAQ About the Snipping Tool in Chromebook
What is the Snipping Tool in Chromebook?
The snipping tool in Chromebook is a built-in feature designed to help users capture screenshots with precision and ease. Unlike traditional screenshot methods that capture the entire screen, this tool allows you to select specific areas, making it ideal for tasks that require accuracy. Whether you're working on a project, creating a tutorial, or saving information for later use, the snipping tool in Chromebook provides a seamless experience.
One of the standout features of the snipping tool in Chromebook is its simplicity. You don’t need to install third-party apps or extensions to use it. The tool is already integrated into the operating system, ensuring that it works smoothly without any additional setup. Additionally, the snipping tool in Chromebook offers basic editing capabilities, allowing you to annotate, crop, and highlight important parts of your screenshots directly within the tool.
Another advantage of the snipping tool in Chromebook is its versatility. You can capture screenshots in various formats, such as PNG or JPEG, and save them directly to your Google Drive or local storage. This flexibility ensures that you can use your screenshots across different platforms and devices, making it a valuable tool for both personal and professional use.
How to Access the Snipping Tool in Chromebook?
Accessing the snipping tool in Chromebook is straightforward, but it might not be immediately obvious if you’re new to the device. Here’s a step-by-step guide to help you locate and activate this feature:
Using Keyboard Shortcuts
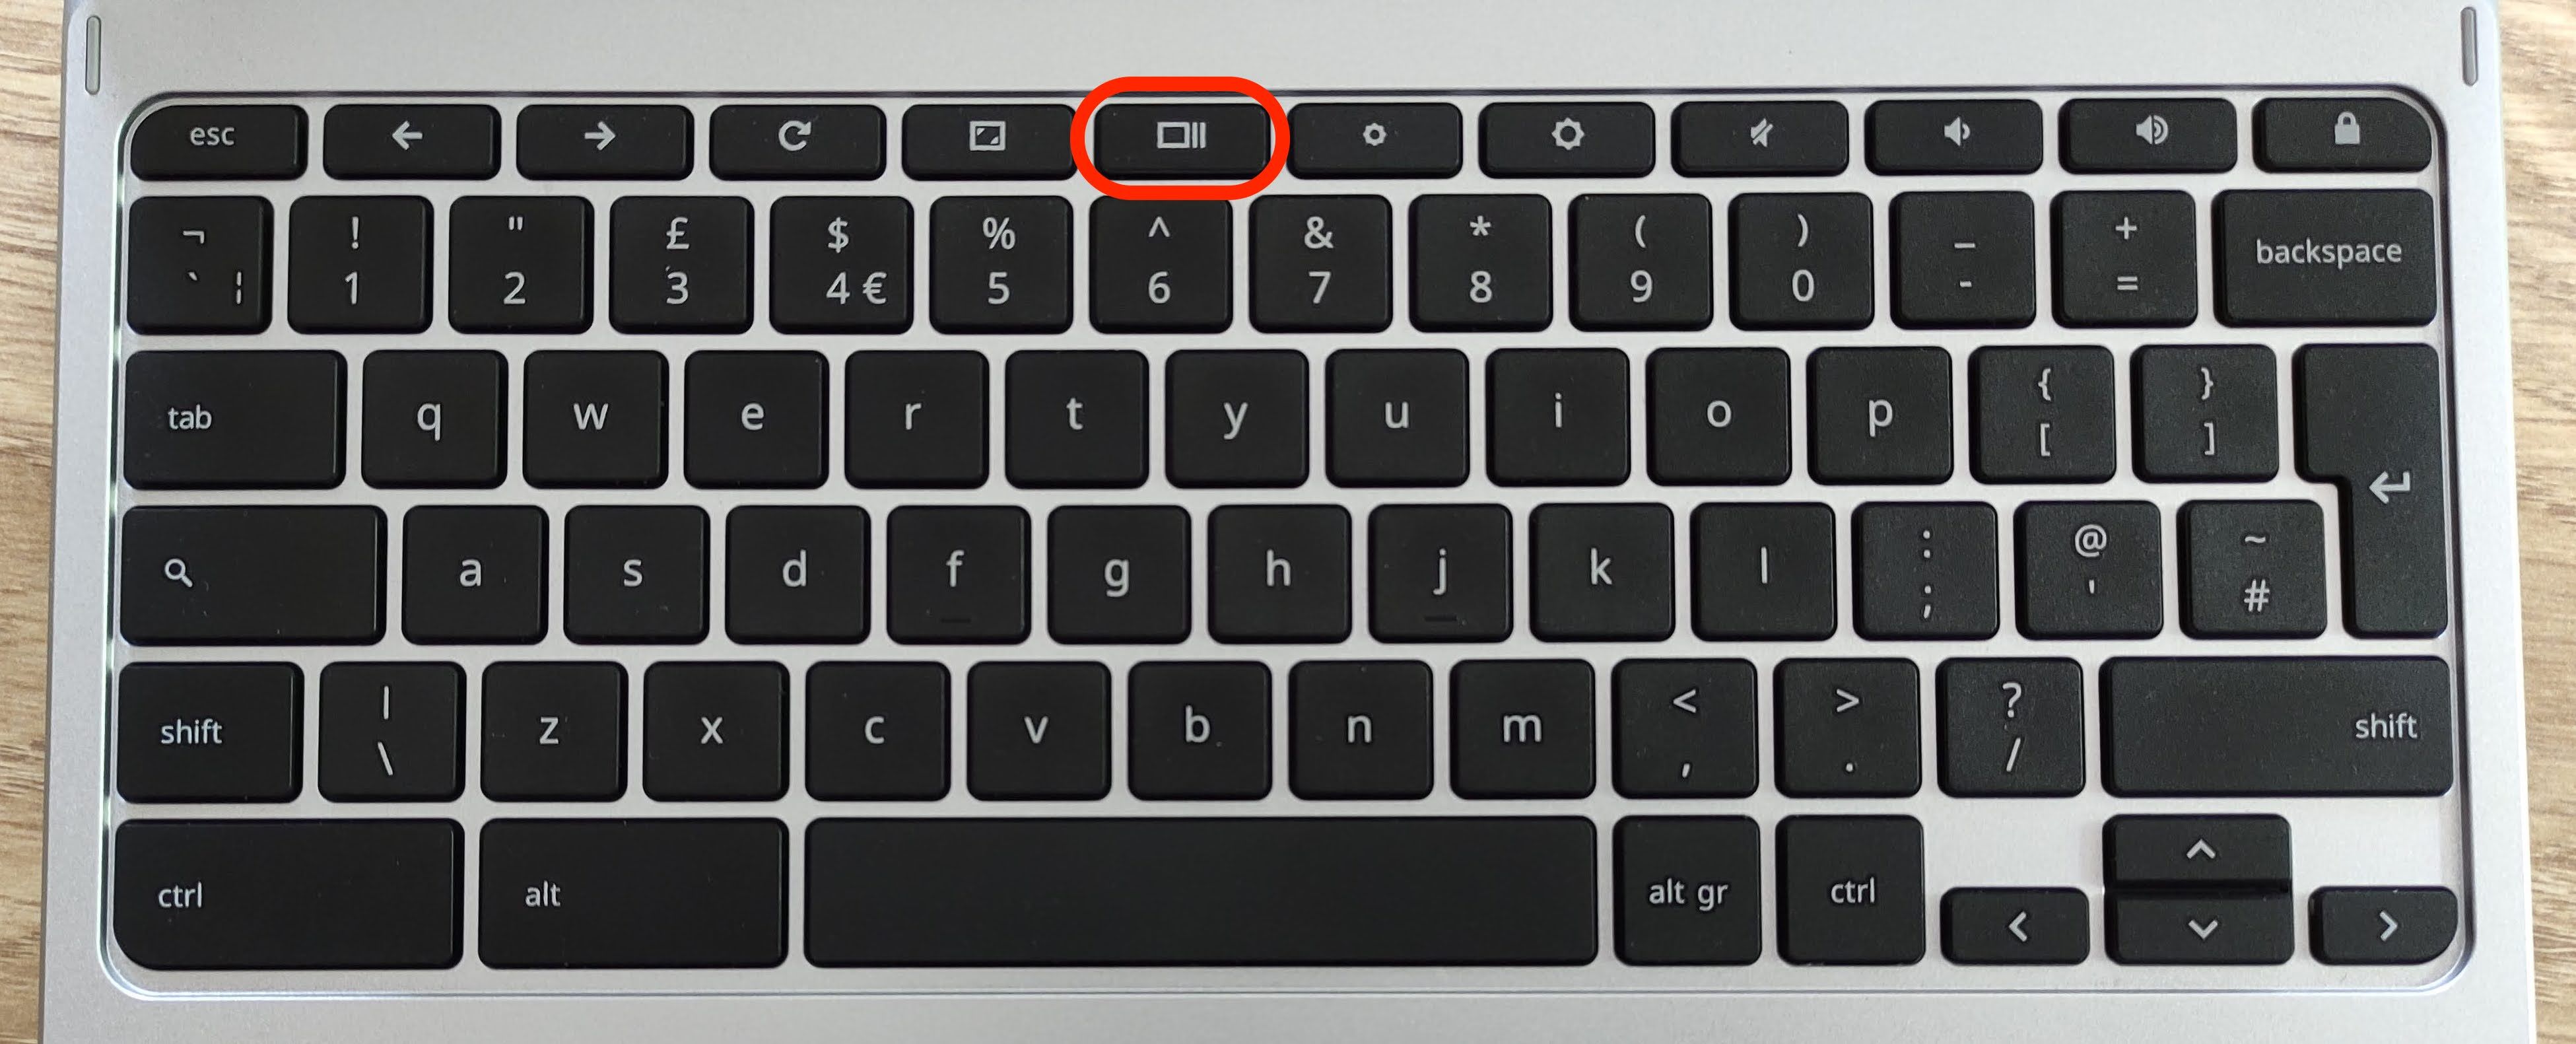
One of the quickest ways to access the snipping tool in Chromebook is by using keyboard shortcuts. Simply press the Ctrl + Shift + Show Windows keys simultaneously. The "Show Windows" key is usually located in the top row of your keyboard and looks like a rectangle with two lines on either side. This combination will activate the snipping tool in Chromebook, allowing you to select the area you want to capture.
Through the Launcher
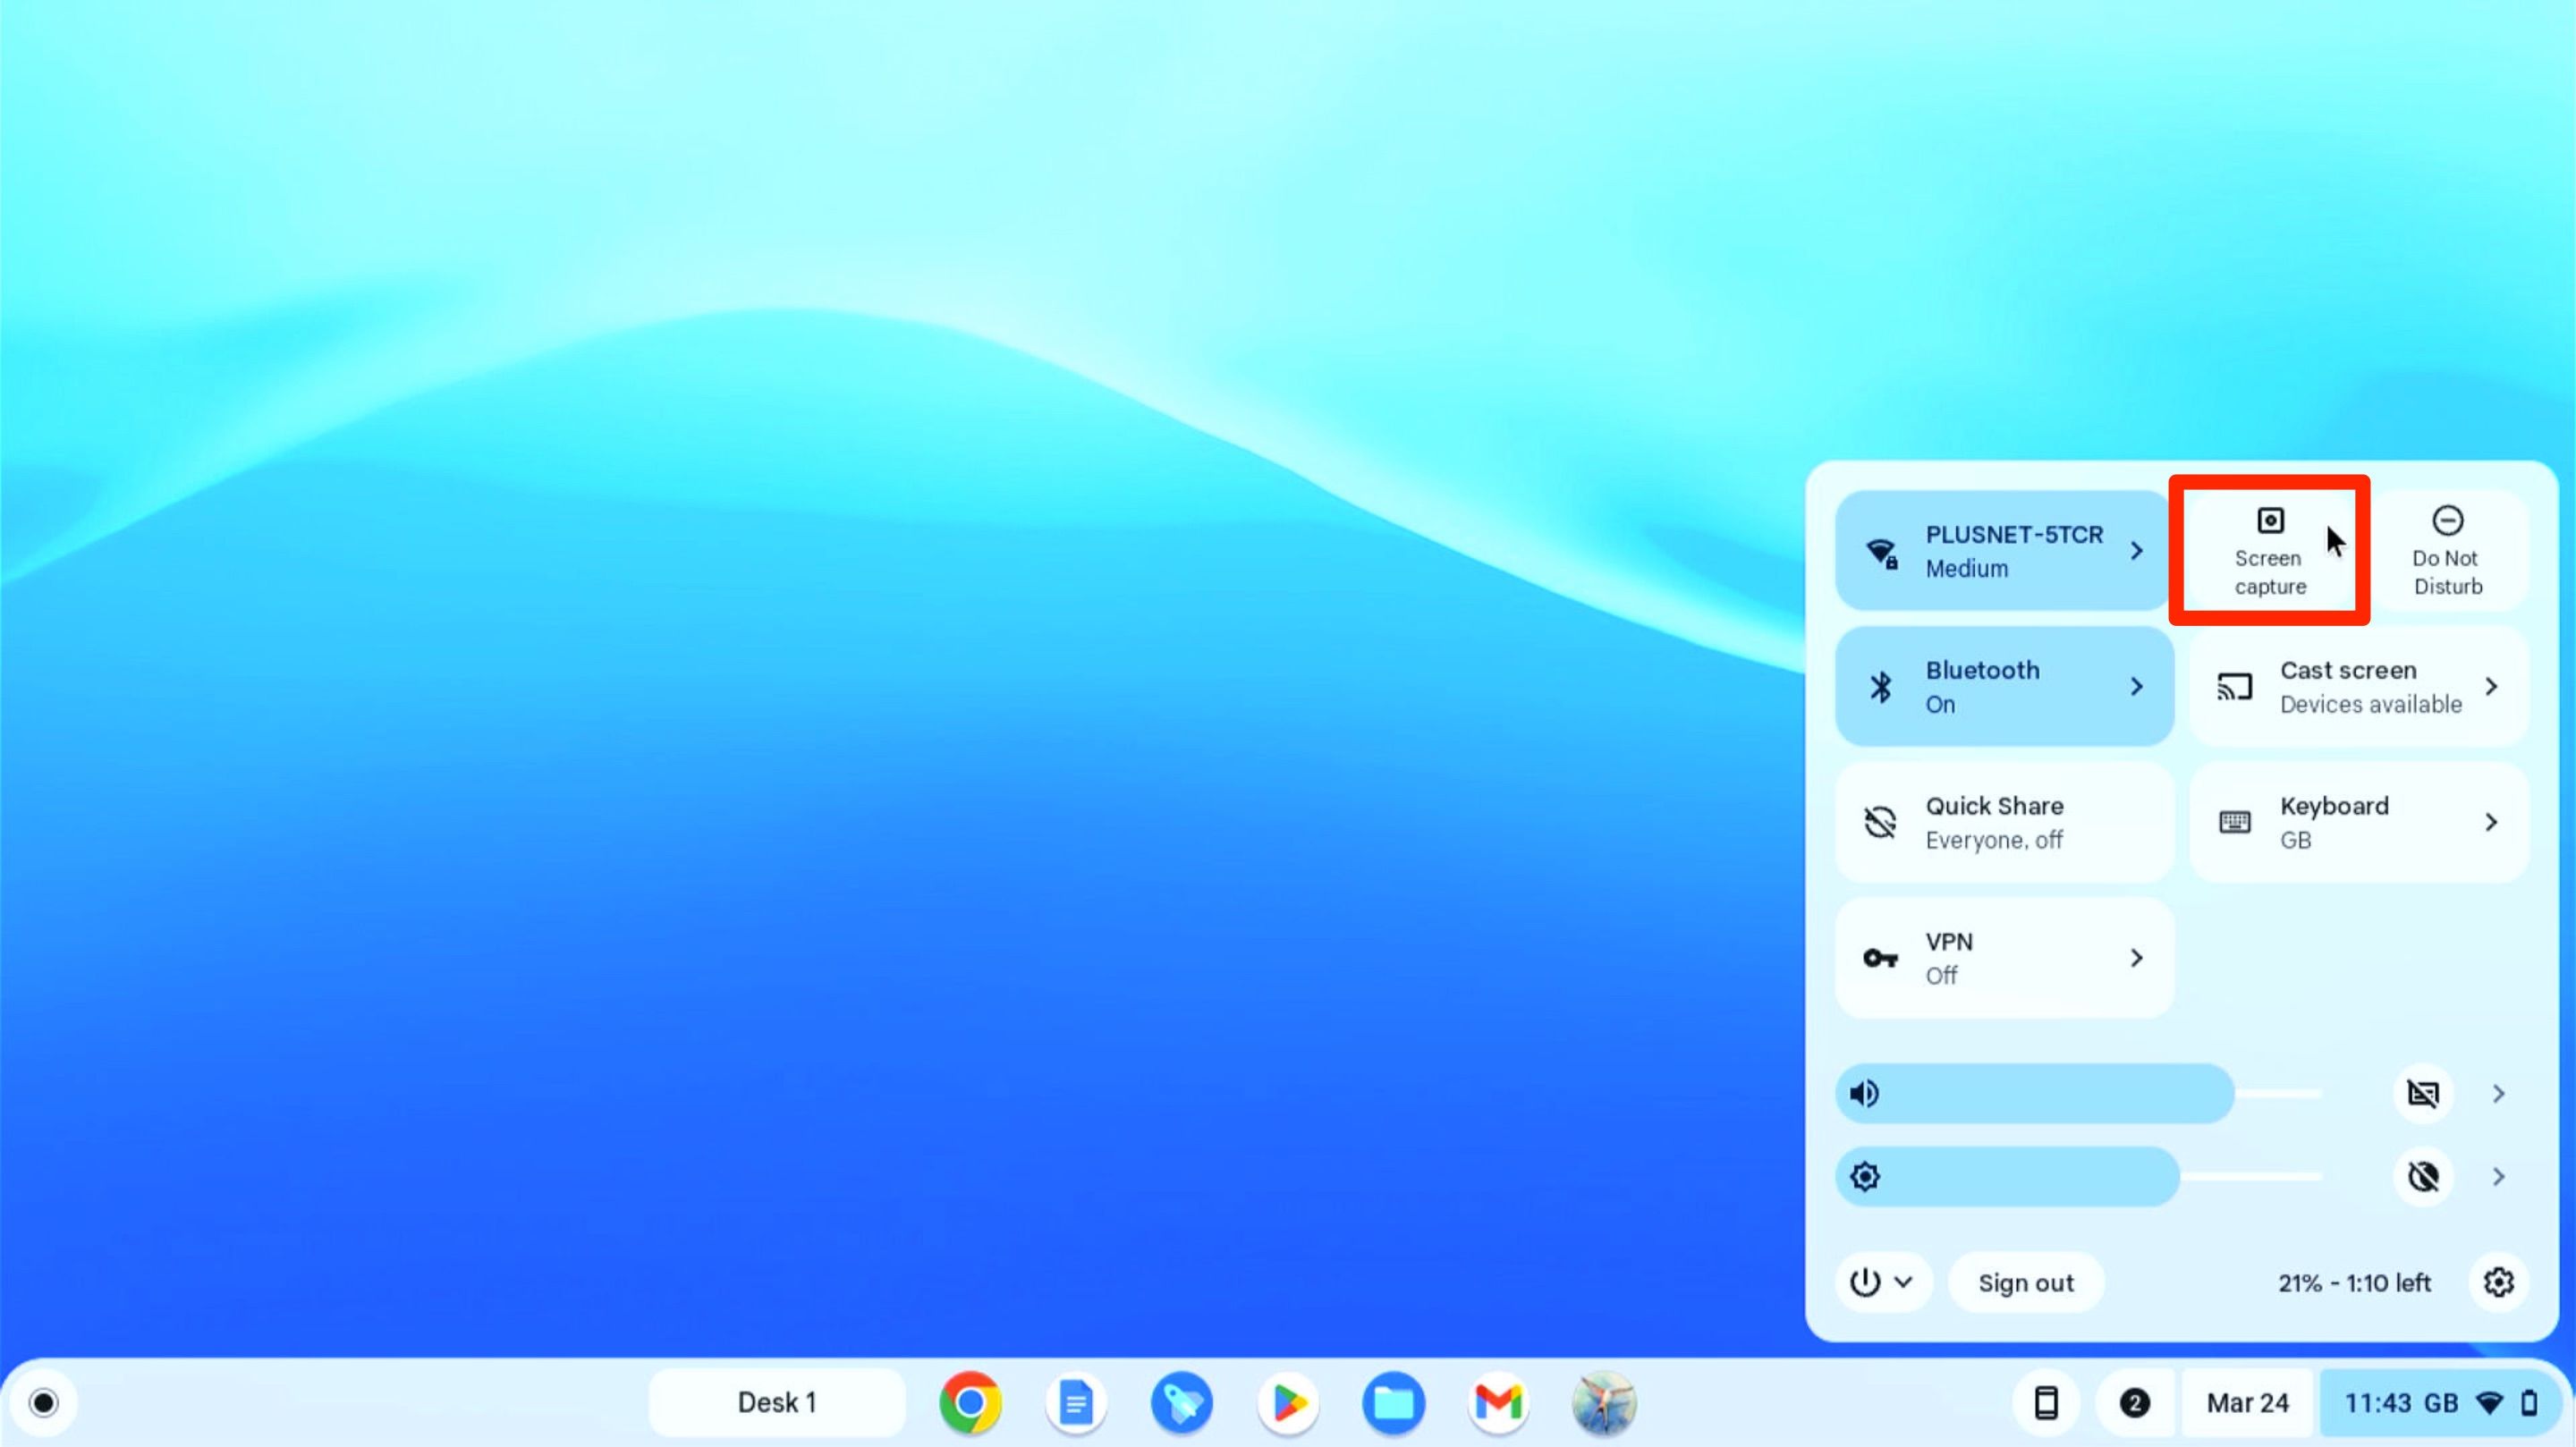
If you prefer using the Chromebook’s interface, you can access the snipping tool in Chromebook through the Launcher. Click on the Launcher icon in the bottom-left corner of your screen, then search for “Screenshot” or “Snipping Tool.” Once you locate the tool, click on it to open and start capturing your desired area.
Read also:Danica Thrall Breedon The Inspiring Journey Of A Rising Star
Alternative Method: Using the Shelf
Another way to access the snipping tool in Chromebook is by adding it to your shelf for quick access. Right-click on the Launcher and select “Add to Shelf.” From there, you can pin the snipping tool in Chromebook to your shelf, making it easily accessible whenever you need it.
Step-by-Step Guide to Using the Snipping Tool in Chromebook
Once you’ve accessed the snipping tool in Chromebook, using it is a breeze. Follow these steps to capture and manage your screenshots effectively:
Step 1: Activate the Snipping Tool
Begin by activating the snipping tool in Chromebook using one of the methods mentioned earlier. Whether you use a keyboard shortcut or access it through the Launcher, ensure the tool is ready for use.
Step 2: Select the Area to Capture
After activating the snipping tool in Chromebook, your screen will dim slightly, and your cursor will change into a crosshair. Click and drag to select the area you want to capture. You can capture a portion of the screen, an entire window, or even the full screen, depending on your needs.
Step 3: Save or Edit Your Screenshot
Once you’ve captured the desired area, the snipping tool in Chromebook will automatically save the screenshot to your clipboard. You can paste it into an application or save it directly to your Google Drive or local storage. Additionally, the tool offers basic editing features, such as cropping and annotating, to enhance your screenshots further.
Pro Tip: Use the Notification Center
After capturing a screenshot, a notification will appear in the bottom-right corner of your screen. Click on this notification to access additional options, such as editing, sharing, or deleting the screenshot. This feature is particularly useful for managing multiple screenshots efficiently.
Can You Edit Screenshots with the Snipping Tool in Chromebook?
Yes, you can edit screenshots using the snipping tool in Chromebook, although the editing capabilities are relatively basic. While it may not offer the advanced features of dedicated photo editing software, the snipping tool in Chromebook provides enough functionality to make your screenshots more informative and visually appealing.
Basic Editing Features
Here are some of the editing features available in the snipping tool in Chromebook:
- Highlighting: Use the highlighter tool to emphasize specific parts of your screenshot.
- Annotations: Add text or arrows to draw attention to important details.
- Cropping: Trim unnecessary parts of the screenshot to focus on the essential information.
Enhancing Your Screenshots
While the snipping tool in Chromebook is great for quick edits, you can also use third-party apps like Google Drawings or Canva for more advanced editing. Simply save your screenshot and import it into these applications for additional customization.
What Are the Best Practices for Using the Snipping Tool in Chromebook?
To make the most of the snipping tool in Chromebook, consider adopting the following best practices:
Organize Your Screenshots
Save your screenshots in a dedicated folder to keep them organized. This practice ensures that you can easily locate and manage your files, especially if you take multiple screenshots daily.
Use Descriptive File Names
When saving screenshots, use descriptive file names that reflect the content or purpose of the image. For example, instead of naming a file “Screenshot_1,” use “Project_Plan_Overview” to make it easier to identify later.
Avoid Cluttering Your Desktop
Instead of saving screenshots directly to your desktop, store them in cloud storage like Google Drive. This approach not only keeps your workspace tidy but also ensures your files are accessible from any device.
How to Save and Share Screenshots Using the Snipping Tool in Chromebook?
Saving and sharing screenshots is a breeze with the snipping tool in Chromebook. Here’s how you can do it:
Saving Screenshots
After capturing a screenshot, the snipping tool in Chromebook automatically saves it to your clipboard. You can paste it into an application or save it directly to your Google Drive or local storage. To save it to Google Drive, simply right-click on the screenshot and select “Save to Google Drive.”
Sharing Screenshots
To share a screenshot, click on the notification that appears after capturing it. From there, you can choose to share the image via email, messaging apps, or social media platforms. Alternatively, you can upload the screenshot to Google Drive and share the link with others.
Pro Tip: Use Google Photos for Backup
If you want to ensure your screenshots are always backed up, enable Google Photos sync. This feature automatically uploads your screenshots to the cloud, ensuring they’re safe and accessible from any device.
Is There a Shortcut for the Snipping Tool in Chromebook?
Yes, there is a shortcut for the snipping tool in Chromebook, and it’s one of the easiest ways to access the tool. By pressing Ctrl + Shift + Show Windows, you can instantly activate the snipping tool in Chromebook and start capturing screenshots. This shortcut is particularly useful for users who need to take screenshots frequently and want to save time.
Customizing Shortcuts
If you find the default shortcut inconvenient, you can customize it to suit your preferences. Go to your Chromebook’s settings, navigate to “Keyboard,” and assign a new shortcut for the snipping tool in Chromebook. This customization ensures that the tool is always within reach.
FAQ About the Snipping Tool in Chromebook
1. Can I Use the Snipping Tool in Chromebook Offline?
Yes, the snipping tool in Chromebook works perfectly offline. You don’t need an internet connection to capture and save screenshots.
2. How Do I Take a Full-Screen Screenshot Using the Snipping Tool in Chromebook?
To capture the entire screen, press Ctrl + Show Windows. This shortcut captures the full screen without requiring you to select an area manually.
3. Can I Use the Snipping Tool in Chromebook to Capture Videos?
No, the snipping tool in Chromebook is designed for capturing static images only. For video recording, you’ll need to use third-party apps or extensions.
Conclusion
The snipping tool in Chromebook is an indispensable feature for anyone looking to capture and manage screenshots efficiently. With its ease of use, versatility, and basic editing capabilities, this tool empowers users to streamline their workflow and enhance their productivity. By mastering the snipping tool in Chromebook, you can take full advantage of its features to create, edit, and share screenshots with confidence.
Whether you’re a student, professional, or casual user, the snipping tool in Chromebook offers a seamless experience that meets your screenshot needs. By following the tips and best practices outlined in this guide, you can ensure that your screenshots are organized, informative, and visually appealing. So, why wait? Start exploring the snipping tool in Chromebook today and discover how it can transform the way you interact with your device.
For more information on Chromebook features, check out